This is the second type of paper making that we are covering this semester under the amazing instruction of Tim Barrett! This coming week, we begin Japanese Papermaking.
Saturday, October 15, 2011
Books and their...


Books and their...
While I've been working in the Book Repair section at the University of Iowa Libraries, I've come across some amazing books. Some books have amazing end papers, spreads, covers and text.
This is a part of a series that I hope to continue as I come across more amazing books and their...
Endpapers!

The Colonial Silversmith

And its gorgeous endpaper. Wood engraving printed in a colour to match the cover.

The Great Artists. The cover is beautiful too.

So is the endsheet!

A detail

William Morris : His Life and Work


Wednesday, October 12, 2011
Book Repair
One of my jobs is in the Book Repair Department in the University of Iowa Libraries. I get to re-back books whose spines are falling apart, tighten hinges, sew in pamphlets for the smaller and thinner stapled books, tip-in pages, erase peoples' pencil scrawls, and repair damaged or torn paper and hinges - three times a week! It's oodles more fun than it sounds!
I documented the rebacking of some books which I will try to describe below. There are two different types of books that I rebacked on this day. One of which is very unique in the way it had been bound. Many books between the late 1930s and early to mid 1940s were evidently bound this way. A simple stab binding, a lot of adhesive and a piece of cloth or buckram attached to the spine. The technique of re-backing these has some differences and the images for these are towards the end. One reference to it earlier is marked with a *.

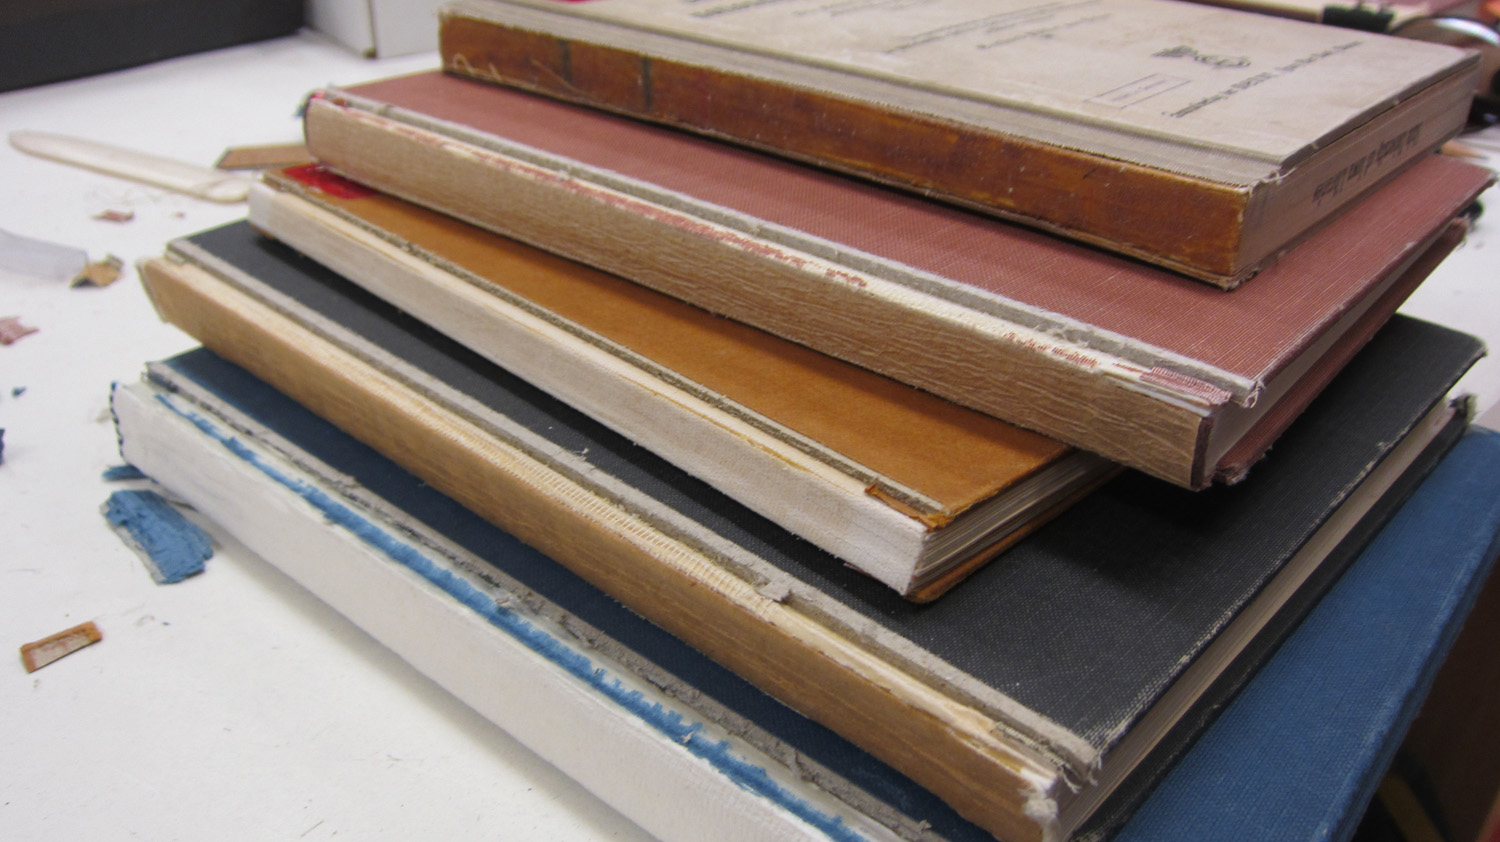
A stack of books ready for re-backing

Making a light cut with a knife and a ruler 2-3 mm. in from the edge of the board on both sides of the book.

Prying the cloth or paper covering off the book board using a flat knife.

It comes off pretty easily unless it has been stuck down with a strong adhesive and the cover is made of paper.

Sometimes the spines surprise you! This one has a backing of what looks like an old newspaper.

The next step is to clip off the 'ears' that are created when the book is being made. These are the turn-ins that keep the book cloth or paper over the spine piece on the inside. These need to be snipped away.

Then the corners are cleaned using scissors form the inside.
All the books without their spines.

Pieces of book cloth or buckram are chosen according to the height of the book. A piece of cardstock that fits snugly along the spine is chosen and cut to size.

The cardstock is adhered to the spine piece - in this case book cloth. The distance from the new spine to the book board + 1 board thickness is measured and marked on both sides on the top and bottom.

The pieces are then trimmed to 1" - 1.5" at the top and bottom and are cut at angles just below the cardstock, using the pencil marks as reference. The triangular piece that is left behind, is folded up over the cardstock and glued.

All the pieces with cardstock. The one on the extreme right* just has the magnetic strip.

The book is placed on the spine piece, aligned to the base line. The opposite side is glued up.

The piece is carefully folded up over the book making sure nothing moves.

It has to be square, and using book cloth doesn't leave much room for error.

Using the bone folder to reinforce the book cloth onto the hinge.

The book is then opened and the tabs are folded in.

A bone folder is used to further secure them.

Another method of re-backing : by tucking the spine under the cover so that there is minimal encroachment on the original book cover.

This binding is different, in that it does not have a spine piece.

The cloth is just peeled away from the spine. Most times it comes away pretty easily.

Detail of the spine.

The Buckram is measured out to go around the book. Since there is no card stock used for the spine, the buckram is marked by folding it around the spine of the book itself.

The triangle is cut out and glued.

A detail of the triangle.

For this type of book, the tabs are cut into triangles so that it is easier for them to be folded in without damaging the book in any way.

It takes some doing, but they do get in there and fit very well.

The bulk of the square tab would cause the book to bulge on the top and bottom.

The finished book!

Wax paper has to be placed where the tabs come in contact with the first page and then they go into the press! TA DA !
There just one last thing though...

Spines that have been removed that are made of cloth have to be cleaned so that they can be glued on to the re-backed books. For this, the paper has to be carefully peeled off first.

The 4 edges are trimmed off. Any remaining paper and adhesive has to be scraped off using a flat knife.This could take a while depending on the amount of paper still adhered to the spine.

The dreaded book dust

After the books have been pressed overnight, the spines are ready to be glued on!
Fall in Iowa
Its been a while since I last posted.
I have re-located to Iowa City, USA. Its very different from Delhi,
and thats all I have to say about that.
and thats all I have to say about that.
I am currently enrolled in the University of Iowa's Center for the Book.
Im going to be posting some of the things I have been working on this semester and hopefully they will be of some interest.

On the way to North Hall.
You dont realize how many leaves trees have until they decide to let them fall.
You dont realize how many leaves trees have until they decide to let them fall.

On my way from the Library
Letterpress 1
My Letterpress class is being conducted by Sara Langworthy.
Finally, I am able to understand Letterpress and Printing and not be intimidated my metal type! It slows down your mind and your hands, and you gain a superb understanding of the type, its history, the page and the text - or atleast, you should!
I wish we'd had a course like this while I was in Srishti, but its better late than never, I guess.
One of our assignments was to print a word and its definition. I picked F.H.B. - Family Hold Back.


Subscribe to:
Posts (Atom)