This summer I went to Barcelona, and from there to a small town an hour away called Capellades. Capellades used to be a thriving town with 16 paper mills. They all had their own source of water, they all ran successfully and made beautiful deckled paper as well as cigarette paper that supplied a majority of markets in Spain, South America and the Philippines for a long time before the introduction of mechanization. The museum itself is housed inside what used to be a papermill and has been set up to resemble a mill from the 18th century. The mill itself is functional and continues to make high quality paper till today. To learn more about the museum, visit their website.
The city of Barcelona is beautiful and full of character
There is a lot of attention to detail. Even the undersides of balconies in apartment buildings are given thought!
There is a huge cactus garden, with many wonderful cactii to look at
And of course, the Mediterranean... what a sight for sore eyes

|
Museu-Molí Paperer de Capellades. The museum has a beautiful 'Bassa' or small pond outside with bright orange fish.
The water from this pond was used by the 16 mills of Capellades |
The re-created part of the mill and the part that is still in use are on the lower floor.
The first step is to sort out of the rags and cut them into small pieces or strips.
The baskets here are filled with linen and cotton rags that were sorted by women and children and shredded into smaller pieces.
They were then put into this large container with mesh on the outside and spun to let out any debris before retting
Here is a photograph that gives a more accurate representation of how this device was used
The rags are then retted for sometimes months at a time in a pit with water and lime.
They are turned from time to time and eventually when ready, they are beaten using wooden stampers
The space is large and leads from one room to another with these beautiful arches
The wooden stampers were powered by this waterwheel, which was powered by the lake, pictured in the first image.
Now the water rushes in to turn the wheel at the flick of a switch to demonstrate its operation
These wooden stampers were used to beat the rag into pulp. They are still operational, but are not connected to the waterwheel.
They are run with electricity, again to demonstrate their operation
Each set of three hammers had specific heads. The pulp would be beaten in one 'vat' and then move on to the next two
which would beat them into finer and even finer pulp, until it was ready for sheet formation
An example of a fine cigarette paper mould. Note the strips of wire mesh that are interwoven to create shadow marks in the finished sheet
This part of the mill is clearly still operational. This is where paper was and is still made.
Originally there would have been three people working to make paper.
The vatman, the coucher and the layer. Today, there is only one person doing the job of all three.
Of course, we must consider that paper of this type is no longer in demand by the thousands.
Click here, to watch a video of the vatman, coucher and layer at work at the Oakdale paper facility at the University of Iowa.
The paper was then pressed in this big press! It would take all the men working at the time to lower the press
The paper was then hung to loft dry on ropes that were strung across the ceiling of the loft.
The windows on either side were left open depending on the weather, temperature and humidity
The papers were then gelatin sized in a tub. The excess was squeezed out carefully in this press.
This is where the stacks of paper were glazed. A finishing touch. The person actually handling this aspect would sit by the machine,
his legs dangling in that space below, rapidly moving the stack under the unrelenting pounding of the glazing hammer.
He would have to be careful not get his fingers pounded in the process!
Papers were stacked up in this contraption and tied tightly together
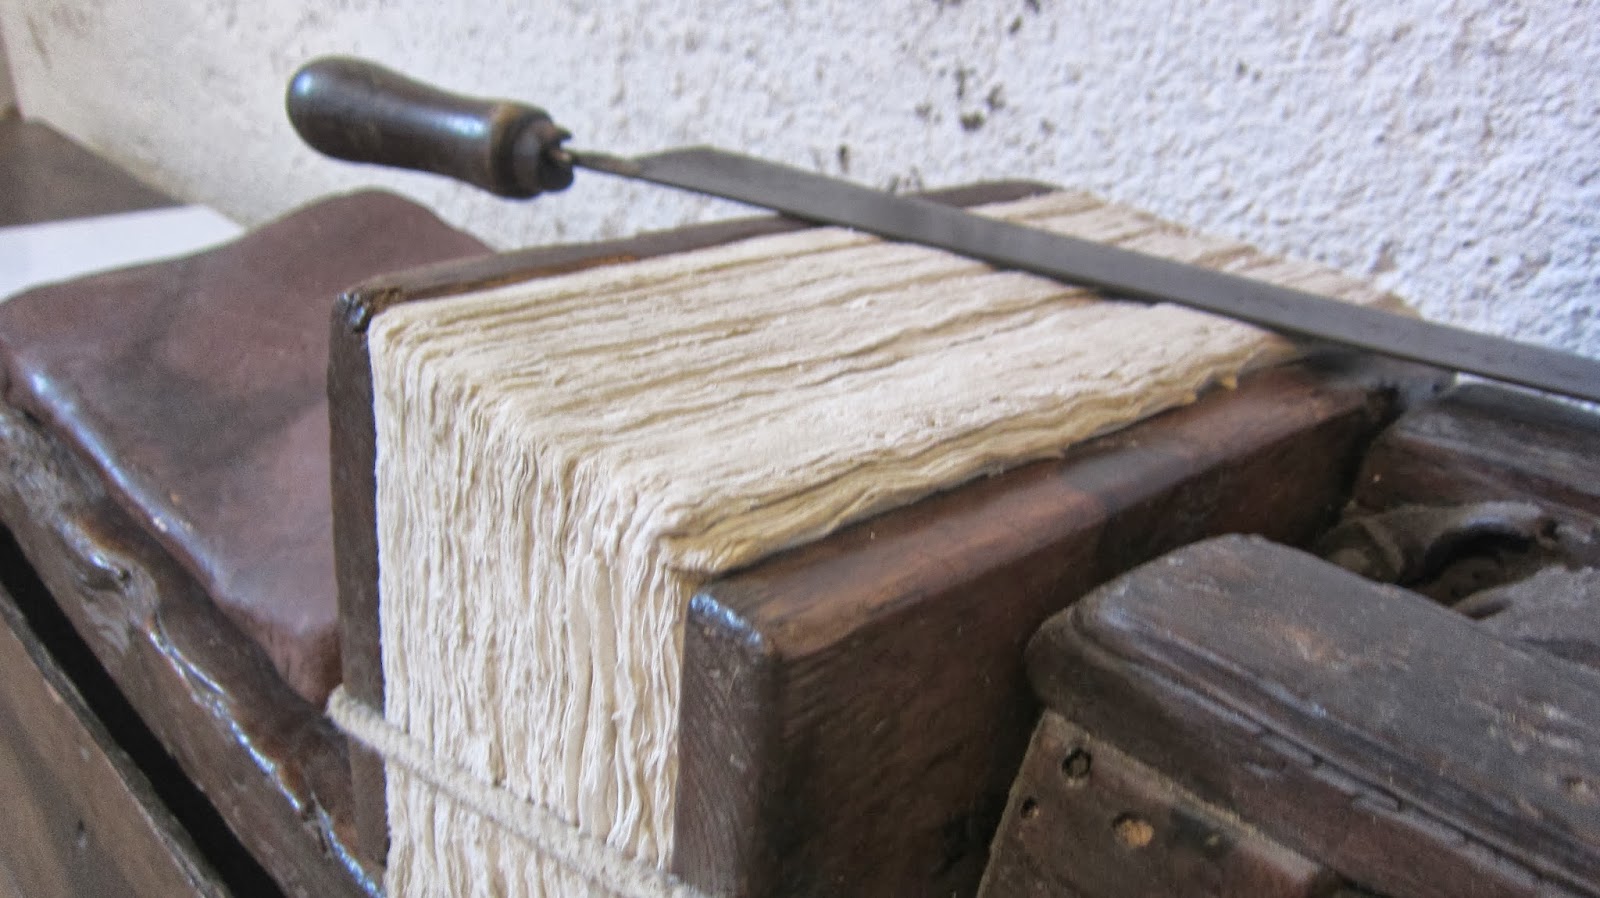
The deckle edges were sliced off using a big sharp knife
Finally, at the end - the finished paper would come to this table for grading.
The final decisions on whether each sheet passed quality control was made here.
Women handled this part of the process. Towards the right of the image, you can see the tub used to size the sheets in
There is a separate room that is a dedicated space for demonstrations and workshops that are conducted with the tours.
This space is also used by artists-in-residence to produce work.
This is where I gave a demonstration of Islamic style papermaking after giving a presentation
on Papermaking in India at the museum.
After the demo, people came over and tried their hand at making a sheet
In exchange for the lecture-demonstration, I was given the space to create work at the museum!
I drew the fish in the pond outside the mill and began another stop motion animation
The instances were cut out of vinyl. They weren't high enough, so each one was stacked one on top of t
he other three times before being attached to the mould surface
The idea was to have the fish swim across the page, as if looking at them from above swimming in water
The vinyl was adhesive backed, but needed to be attached with wires to secure it to the mould surface
I used some of the leftover fermented hemp form the demo, and some of the cotton rag they use to make paper at the mill
I also tried to make a second piece with the fish a whole shape, instead of an outline
It looks like its underwater!
A happy accident! I love how the paper looks like ripples in the water surface.
The actual video is still being edited! Its a long process...!