In the middle of February one of my own personal god came to UICB to conduct a two day workshop. Gaylord Schanilec of Midnight Paper Sales based out of Wisconsin came to share with us, his skills and knowledge. After the research I did on him last semester for class I have been following his blog and his past work, which is simply mind-blowing to say the least.
All images posted here have been taken with the permission of the artist.
Please do not use or reproduce these in any way.
He prepares his own beautifully finished type high blocks
out of the wood on his land, ready to be carved.
They are both long grain and end grain
A block of wood printed as is
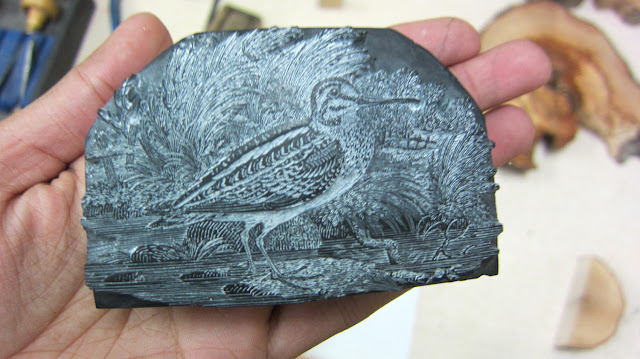
He also showed us some examples of end grain
engravings done long ago that he had acquired
The detail is astonishing
Look how tiny the trees are at the back
And the block itself is tiny!
A fish as part of his River project, carved by Schanilec
A detail of the scales
Gaylord's demo block that he carved in under 2 hours.
He also showed us how to print onto another block to make registration easy. Genius!
He also showed us how to print onto another block to make registration easy. Genius!
He brought along a bunch of progression proof from his Mayflies book. Just astounding!
Please click on these to truly appreciate the detail
When speaking of reductions, the keyblock as I understand it,
is the block that contains the most information relevant to
all other press runs. In this case I would guess its the third one from the left
is the block that contains the most information relevant to
all other press runs. In this case I would guess its the third one from the left
I suppose the keyblock here is the first image on the left.
These proofs are a great way to appreciate the work that goes into every single print as well as learn about the way colour interacts when overprinted.
Run 1
Run 2
Run 3
Run 4
Run 5
This run makes me wonder whether this wasn't the keyblock.
Notice the light hair like texture at the edge of the wings?
This was printed at the end in the lightest colour.
Maybe this was a separate block all together
Im embarrassed to even post this. Here goes.
We each had a block to carve. I decided to start with an endgrain block using an image
I had used to last semester's final project broadside. The image is copied onto paper vellum
with a pencil and then rubbed onto a lightly waxed piece of wood.
Alternatively you can also do a xerox transfer
The paper helps the carbon from the pencil from smudging as you attempt to carve the block.
The xerox transfer method works better because
it doesn't wear off like the pencil. Carving endgrain wood is hard!!
Gaylord also cut some of our carving tools down to size so that they would be easier to hold.
It made carving alot easier. This is a detail of carving out the the outlines
of the form before clearing out the larger areas around the image
Clearing
It took a looong time to clear all this! Its harder than it looks
Ofcourse no one managed to finish carving their blocks by the end of the second day.
We took the rest of the semester. Because the blocks aren't square, you either
square them up using a saw or figure out a way to make the furniture fit around it.
I did neither. I also hand inked it (using a large brayer)
After printing the edition on regular weight paper I printed
some small postcards on this thicker paper.
All the clearing I had done didn't work quite as well -
all that apparently not-type-high part of the block printed.
By this point I was too tired to care!
some small postcards on this thicker paper.
All the clearing I had done didn't work quite as well -
all that apparently not-type-high part of the block printed.
By this point I was too tired to care!


No comments:
Post a Comment